
图文混排在iOS开发中经常遇到, 故总结了多种解决方案, 以便将来使用。本文先总结简单的方法-对控件的使用。这些控件包括UIWebView, UILabel, UITextView, UITextField, 都可以进行图文混排, 各有各的使用场景。
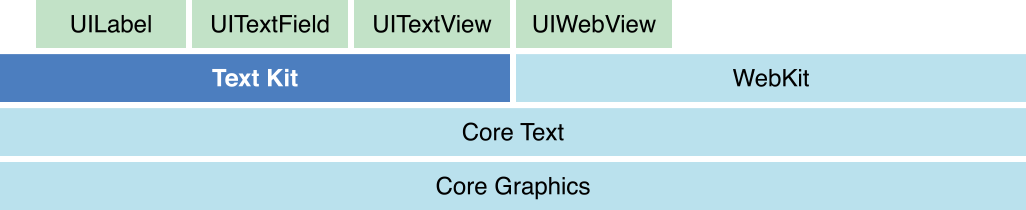
下图是控件基础架构, iOS7以前这几个控件都是基于WebKit开发, 而iOS7之后推出了TextKit, 重写了TextView, Label, TextField这几个控件。
一. UIWebView
WebView呈现图文混排比较简单, 只需要加载写好的html或者URL, 图文混排由网页实现。
二. UILabel
不管是UILabel还是UITextView的图文混排, 都是操作NSAttributedString, NSMutableAttributedString。
- 我们先创建一个label, 让label能自动换行, 居中显示
// 创建label
let label = UILabel(frame: self.view.bounds)
label.textAlignment = .Center   // 居中排列
label.lineBreakMode = .ByWordWrapping    // 按词换行
label.numberOfLines = 0 // 自动换行
self.view.addSubview(label)
- 创建NSMutableAttributedString
let attributedText = NSMutableAttributedString(string: "Jacob was a year and a half older than I and seemed to enjoy reading my gestures and translating my needs to adults. He ensured that cartoons were viewed, cereal was served, and that all bubbles were stirred out of any remotely bubbly beverage intended for me. In our one-bedroom apartment in southern New Jersey, we didn’t have many toys. But I had a big brother and Jacob had a baby sister. We were ignorant of all the pressed plastic playthings we didn’t have.")
- 文本有了之后, 就只剩下图片了。可是NSMutableString并不直接支持图片加入其中, 但是能插入附件, 我们把图片当附件插入文本中
// 图片附件
let imageAttachment = NSTextAttachment()
imageAttachment.image = UIImage(named: "catanddog") // 设置附件的image属性

// 调整图片位置到中间
imageAttachment.bounds = CGRectMake(0, -imageAttachment.image!.size.height / 2, imageAttachment.image!.size.width, imageAttachment.image!.size.height)

// 将带图片附件的string插入到指定位置
attributedText.insertAttributedString(NSAttributedString(attachment: imageAttachment), atIndex: 50)
图文混排的效果就出现了

至于怎么使用网络图片, 其实很简单, 只需要在图片下载完之后插入到指定位置就可以了。
- 觉得文本样式太简单了, 我们可以多点样式
// 高亮
attributedText.addAttribute(NSForegroundColorAttributeName, value: UIColor.redColor(), range: NSMakeRange(0, 3))

// 下划线
attributedText.addAttribute(NSUnderlineStyleAttributeName, value: NSUnderlineStyle.StyleSingle.rawValue, range: NSMakeRange(0, 10))

// 字体
attributedText.addAttribute(NSFontAttributeName, value: UIFont.boldSystemFontOfSize(50), range: NSMakeRange(20, 10))

// 背景色
attributedText.addAttribute(NSBackgroundColorAttributeName, value: UIColor.yellowColor(), range: NSMakeRange(30, 10))

// 删除线
attributedText.addAttribute(NSStrikethroughStyleAttributeName, value: NSUnderlineStyle.StyleSingle.rawValue, range: NSMakeRange(120, 20))

// 斜体
attributedText.addAttribute(NSObliquenessAttributeName, value: 1, range: NSMakeRange(100, 10))

// 阴影
let shadow = NSShadow()
shadow.shadowOffset = CGSize(width: 3.0, height: 3.0)
shadow.shadowColor = UIColor.redColor()
attributedText.addAttribute(NSShadowAttributeName, value: shadow, range: NSMakeRange(0, 15))

// 横竖文本
attributedText.addAttribute(NSVerticalGlyphFormAttributeName, value: 0, range: NSMakeRange(70, 10))
丰富多样的效果出现了

至此, Label的图文混合(包括富文本)处理已经完成, 至于排版视具体情况而定。
但是, Label的富文本处理出现了几个问题, 现一并记录在此
- 1.只剩下下面两个样式下划线和阴影, 两个样式的范围索引都从0开始
// 下划线
attributedText.addAttribute(NSUnderlineStyleAttributeName, value: NSUnderlineStyle.StyleSingle.rawValue, range: NSMakeRange(0, 10))

// 阴影
let shadow = NSShadow()
shadow.shadowOffset = CGSize(width: 3.0, height: 3.0)
shadow.shadowColor = UIColor.redColor()
attributedText.addAttribute(NSShadowAttributeName, value: shadow, range: NSMakeRange(0, 15))
出现了以下效果

- 2.还是只有下划线和阴影两个样式, 下划线的范围索引从0开始, 阴影的范围索引只要是非0就可以
// 下划线
attributedText.addAttribute(NSUnderlineStyleAttributeName, value: NSUnderlineStyle.StyleSingle.rawValue, range: NSMakeRange(0, 10))

// 阴影
let shadow = NSShadow()
shadow.shadowOffset = CGSize(width: 3.0, height: 3.0)
shadow.shadowColor = UIColor.redColor()
attributedText.addAttribute(NSShadowAttributeName, value: shadow, range: NSMakeRange(100, 15))
结果阴影效果未出现

这两个问题都是同一个原因导致, 只要将下划线的范围索引改成非0就都可以正常显示, 这里有相同问题的讨论, 可供参考。
三. UITextView
-
1.TextView的富文本处理跟Label一样都是操作NSAttributedString, 所以把Label的富文本代码复制过来, 就一样可以显示效果了
而针对Label出现的两个问题在TextView上不会出现, 说明Label的富文本是有问题的。
2.TextView富文本的自定义方式, 先来看下这种方式下的结构(图片来源于Apple)

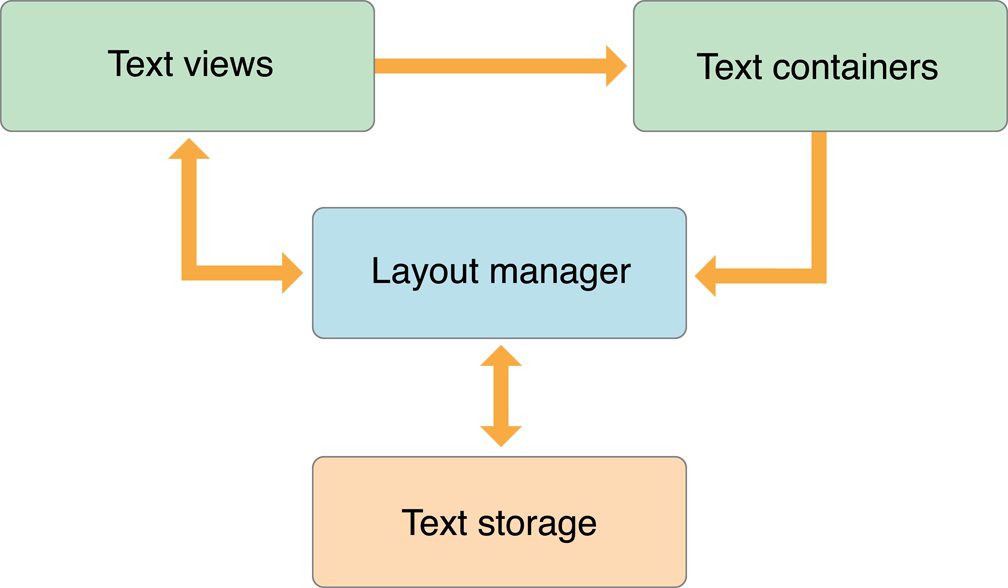
- TextStorage 文本存储类, 可继承实现自定义功能
- LayoutManager 文本排版类, 通过将TextStorage中的的数据转换为显示的文本
- TextContainer 文本容器, 定义了文本可显示的区域, 通过子类化NSTextContainer来创建别的一些形状,例如圆形、不规则的形状。
这三个类之间可以形成一对多的关系, 如图所示(图来自苹果)
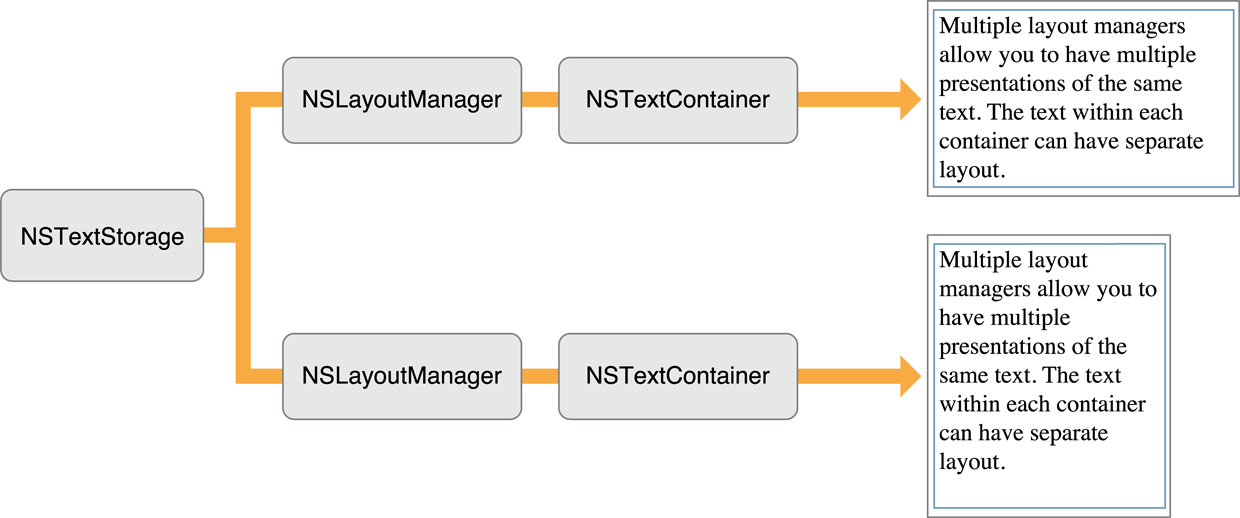
此处我们只创建一个一对一的关系
// 创建TextStorage, TextStorage必须被强引用
self.textStorage = NSTextStorage(string: text)

// 创建LayoutManager
let layoutManager = NSLayoutManager()
self.textStorage?.addLayoutManager(layoutManager)

// 创建TextContainer
let textContainer = NSTextContainer(size: self.view.bounds.size)
layoutManager.addTextContainer(textContainer)

// 创建TextView, 传入textContainer
self.textView = UITextView(frame: self.view.bounds, textContainer: textContainer)
self.textView?.delegate = self
self.view.addSubview(self.textView!)
这样就创建好了, 而例如高亮, 阴影等样式可以像之前那样直接设置, 此处不多说了。然后创建图片视图
self.imageView = UIImageView(image: UIImage(named: "catanddog"))
self.imageView?.center = CGPointMake(self.view.bounds.size.width / 2, self.imageView!.frame.size.height / 2 + 200)
self.view.addSubview(self.imageView!)

// 并给imageView加入手势, 为了拖动图片
self.imageView?.addGestureRecognizer(UIPanGestureRecognizer(target: self, action: #selector(imagePan)))
self.imageView?.userInteractionEnabled = true
界面都创建好了, 那么就来更新图片在文本中的位置
func updateExclusionPaths() {
    // 计算图片所占范围
    var imageRect = self.textView?.convertRect(self.imageView!.frame, fromView: self.view)
    imageRect!.origin.x -= self.textView!.textContainerInset.left;
    imageRect!.origin.y -= self.textView!.textContainerInset.top;
    let path = UIBezierPath(rect: imageRect!)
    self.textView?.textContainer.exclusionPaths = [path]
}
这样就出现了图文混排我们所需要的效果了, 既然我们加入了拖动图片的手势, 那么怎么让文本图片拖动而变化了
func imagePan(pan: UIPanGestureRecognizer) {
    if pan.state == .Began {
      self.panOffset = pan.locationInView(self.imageView!)
    }

    let location = pan.locationInView(self.view)
    var imageCenter = self.imageView!.center

    // 让图片随手势变化位置
    imageCenter.x = location.x - self.panOffset.x + self.imageView!.frame.size.width / 2
   imageCenter.y = location.y - self.panOffset.y + self.imageView!.frame.size.height / 2

   self.imageView?.center = imageCenter
   self.imageCenterY = imageCenter.y + self.textView!.contentOffset.y + navigationBarHeight

   // 更新文本排版
   updateExclusionPaths()
}
此时, 拖动图片, 文本也可随着图片位置的变化而重新排版了, perfect!!!有没有? 但是, 如果文本太长导致textView可以上下滚动了, 完了, 图片不动了
// 实现ScrollViewDelegate协议, 让textView滚动的时候, 图片也动起来
func scrollViewDidScroll(scrollView: UIScrollView) {
    self.imageView?.center = CGPointMake(self.imageView!.center.x, self.imageCenterY - (scrollView.contentOffset.y + navigationBarHeight))
}
perfect!!! 我们来看看效果

可是还是有一个问题, 当设置了字体样式时就出问题了
// 字体
self.textStorage?.addAttribute(NSFontAttributeName, value: UIFont.boldSystemFontOfSize(50), range: NSMakeRange(220, 1))
设置字体后, 当拖动图片到这个大字体附近就会出现大段空白的情况, 谁能告诉我为什么? 有大牛能帮解释下么?
好了, 这篇到此结束了, 源码在此, 请查收!!!
参考:
https://developer.apple.com/library/ios/documentation/StringsTextFonts/Conceptual/TextAndWebiPhoneOS/CustomTextProcessing/CustomTextProcessing.html
https://objccn.io/issue-5-1/
https://www.raywenderlich.com/50151/text-kit-tutorial
本文由啸寒原创, 转载请注明出处!!!
