# 写在前面
yolo v3虽说只是之前版本技术与其他经典网络模型优点的结合体,并没有更多新内容,但总体结构还是很复杂的,在学习yolo v3时,如果心中没有一个清晰的结构图,那理解起来绝对很困难(自己深有体会),而作者只在v1的论文里给出了结构图,v2和v3中都没有给出,并且v3的论文相对于v1 v2来说篇幅更短、有用信息更少,这也一定程度上增加了学习的难度。
# 一、网络结构
## 1.1 backbone:Darknet-53
backbone部分由Yolov2时期的Darknet-19进化至Darknet-53,加深了网络层数,引入了Resnet中的跨层加和操作。Darknet-19和Darknet-53的网络结构对比见图1。
<img src="https://s1.ax1x.com/2020/07/21/UTlcee.png" alt="图1:darknet-19与darknet-53的架构区别" style="zoom:50%;" />
从图1可以看出,darknet-19是不存在残差结构的,和VGG是同类型的backbone。几种经典网络的性能对比见图2
<img src="https://s1.ax1x.com/2020/07/21/UTlyLD.png" alt="图2:Darknet精度性能对比" style="zoom:60%;" />
从上表可以看出,Darknet-53处理速度每秒78张图,比Darknet-19慢不少,但是比同精度的ResNet快很多。yolo_v3其实并没有刻意追求速度,而是在保证实时性(fps>36)的基础上追求精度。不过如果你要想更快,可以用一行代码切换到tiny-darknet。搭载tiny-darknet的yolo可以达到state of the art级别,甚至可以与squeezeNet相匹敌,详情可以看图3:
<img src="https://img-blog.csdn.net/20180912155142706?watermark/2/text/aHR0cHM6Ly9ibG9nLmNzZG4ubmV0L2xldmlvcGt1/font/5a6L5L2T/fontsize/400/fill/I0JBQkFCMA==/dissolve/70" alt="图3:Tiny-Darknet精度性能对比" style="zoom:67%;" />
所以,有了yolo v3,就真的用不着yolo v2了,更用不着yolo v1了。这也是[yolo官方网站](https://pjreddie.com/darknet/),在v3出来以后,就没提供v1和v2代码下载链接的原因了。

## 1.2 详细框架
先奉上总体结构图,来自知乎博主Algernon的文章【[Yolo三部曲解读——Yolov3](https://zhuanlan.zhihu.com/p/76802514)】

在Yolov3中只有卷积层,不存在池化层和全连接层。通过**调节卷积步长控制输出特征图的尺寸**。所以对于输入图片尺寸没有特别限制。
上面流程图中,输入样例图片的大小为256x256。总共输出3个特征图,细节如下:
1. **过程**:输入图像经过Darknet-53(无全连接层),再经过Yoloblock(512)生成特征图被当作两用,第一用经过3x3卷积层、1x1卷积层之后生成特征图一;第二用经过1x1卷积层加上采样层,与Darnet-53网络的中间层输出结果进行拼接,经过Yoloblock(256)后再被当作两用,第一用经过3x3卷积层、1x1卷积层之后生成特征图二;第二用经过1x1卷积层加上采样层,与Darnet-53网络的另一中间层输出结果进行拼接,经过Yoloblock(128)后再经过3x3卷积层、1x1卷积层生成特征图三。
> SSD直接采用backbone中间层的处理结果作为feature map的输出
>
> YOLO v3将中间层的处理结果和后面网络层的上采样结果做一个拼接作为feature map的输出
2. **尺寸**:特征图的输出维度为 $N*N*[3*(4+1+80)]$ ,$N*N$ 为输出特征图格点数,一共3个Anchor框,每个框有4维预测数值 $t_x,t_y,t_w,t_h$ ,1维预测框置信度,80维预测物体类别。所以第一层特征图的输出维度为 8x8x255。因为第二层、第三层各加入了一次上采样,所以输出维度分别为16x16x255、32x32x255
3. **效果**:从输入到输出,第一个特征图下采样32倍,第二个特征图下采样16倍,第三个下采样8倍。
4. **目的**:Yolov3借鉴了`金字塔特征图`思想,使用不同大小的特征图去检测物体,<font color=red>小尺寸特征图用于检测大尺寸物体,而大尺寸特征图检测小尺寸物体。</font>
```
上采样(upsample):是将小尺寸特征图通过插值等方法,生成大尺寸图像。例如使用最近邻插值算法,将8x8的图像变换为16x16。上采样层不改变特征图的通道数。
```
**Yolo的整个网络,吸取了Resnet、Densenet、FPN的精髓,可以说是融合了目标检测当前业界最有效的全部技巧。**
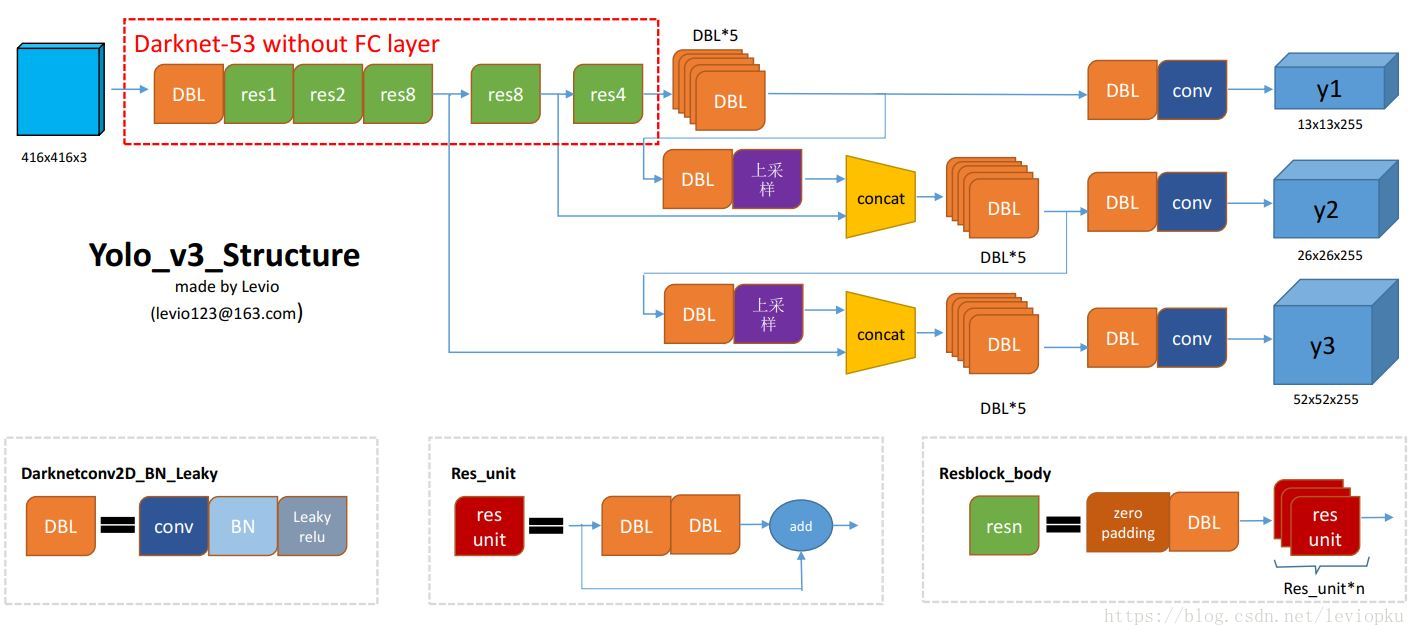
上图4是以输出结果为结点,以动作为连线,信息多且杂,下面给出一个以动作为结点的[流程图](https://blog.csdn.net/leviopku/article/details/82660381),可能看起来会更直观吧。

对图5做一些补充解释:
- **DBL**: 就是卷积+BN+Leaky relu。对于v3来说,BN和leaky relu已经是和卷积层不可分离的部分了(最后一层卷积除外),共同构成了最小组件。
- **Res unit**:借鉴Resnet网络中的残差结构,让网络可以构建的更深。
- **resn**:n代表数字,有res1,res2, … ,res8等等,表示这个res_block里含有多少个res_unit。这是yolo_v3的大组件,yolo_v3开始借鉴了ResNet的残差结构,使用这种结构可以让网络结构更深。对于res_block的解释,可以在图1的右下角直观看到,其基本组件也是DBL。
其他基础操作:
**concat**:张量拼接。将darknet中间层和后面的某一层的上采样进行拼接。拼接的操作和残差层add的操作是不一样的,加和操作来源于ResNet,将输入的特征图,与输出特征图对应维度进行相加,即 $y=f(x)+x$ ;而concat操作源于DenseNet,将特征图按照通道维度直接进行拼接,例如8x8x16的特征图与8x8x32的特征图拼接后生成8x8x48的特征图。
# 二、Yolo输出特征图解码(前向过程)
yolo v3输出了3个不同尺度的feature map,这也是v3论文中提到的改进点:predictions across scales。这个借鉴了**FPN**,采用上采样的方法来实现这种多尺度的feature map,对不同size的目标进行检测,越精细的grid cell就可以检测出越精细的物体。
在Yolov3的设计中,每个特征图的每个格子中,都配置3个不同的先验框,所以最后三个特征图,这里暂且reshape为13 × 13 × 3 × 85、26 × 26 × 3 × 85、52 × 52 × 3 × 85,这样更容易理解,在代码中也是reshape成这样之后更容易操作。如图6所示。
<img src="https://s1.ax1x.com/2020/07/24/UvFVOS.png" alt="图6:映射细节" style="zoom:40%;" />
三张特征图就是整个Yolo输出的检测结果,检测框位置(4维)、检测置信度(1维)、类别(80维)都在其中,加起来正好是85维。特征图最后的维度85,代表的就是这些信息,而特征图其他维度N × N × 3,N × N代表了检测框的参考位置信息,3是3个不同尺度的先验框。下面详细描述怎么将检测信息解码出来(类似于v2):
- 先验框
在Yolov1中,网络直接回归检测框的宽、高,这样效果有限。所以在Yolov2中,改为了回归基于先验框的变化值,这样网络的学习难度降低,整体精度提升不小。Yolov3沿用了Yolov2中关于先验框的技巧,并且使用k-means对数据集中的标签框进行聚类,得到类别中心点的9个框,作为先验框。9个anchor会被三个输出张量平分的。根据大中小三种size各自取自己的anchor。另外,作者使用了logistic回归来对每个anchor包围的内容进行了一个目标性评分(objectness score)。 根据目标性评分来选择anchor prior进行predict,而不是所有anchor prior都会有输出。
`注:先验框只与检测框的w、h有关,与x、y无关。`
- 检测框解码
有了先验框与输出特征图,就可以解码检测框 x,y,w,h。
$$
b_x=\sigma(t_x)+c_x\\
b_y=\sigma(t_y)+c_y\\
b_w=p_we^{(t_w)}\\
b_h=p_he^{(t_h)}\\
$$
如图7所示,$\sigma(t_x),\sigma(t_y)$ 是基于矩形框中心点左上角格点坐标的偏移量, $\sigma$ 是**激活函数**,论文中作者使用 sigmoid。$p_w,p_h$ 是先验框的宽、高,通过上述公式,计算出实际预测框的宽高 $(b_w,b_h)$ 。
<img src="https://s1.ax1x.com/2020/07/12/U85Yzn.png" alt="图7:检测框解码" style="zoom:45%;" />
举个具体的例子,假设对于第二个特征图16 × 16 × 3 × 85中的第[5,4,2]维,上图中的 $c_y$ 为5, $c_x$ 为4,第 二个特征图对应的先验框为(30×61),(62×45),(59× 119),prior_box的index为2,那么取最后一个59,119 作为先验w、先验h。这样计算之后的 $b_x,b_y$ 还需要乘以特征图二的采样率16,得到真实的检测框x,y。
- 检测置信度解码
物体的检测置信度,在Yolo设计中非常重要,关系到算法的检测正确率与召回率。置信度在输出85维中占固定一位,由sigmoid函数解码即可,解码之后数值区间在[0,1]中。
- 类别解码
COCO数据集有80个类别,所以类别数在85维输出中占了80维,每一维独立代表一个类别的置信度。使用sigmoid激活函数替代了Yolov2中的softmax,取消了类别之间的互斥,可以使网络更加灵活。
三个特征图一共可以解码出 8 × 8 × 3 + 16 × 16 × 3 + 32 × 32 × 3 = 4032 个box以及相应的类别、置信度。这4032个box,在训练和推理时,使用方法不一样:
1. 训练时4032个box全部送入打标签函数,进行后一步的标签以及损失函数的计算。
2. 推理时,选取一个置信度阈值,过滤掉低阈值box,再经过nms(非极大值抑制),就可以输出整个网络的预测结果了。
# 三、训练策略与损失函数(反向过程)
## 3.1 训练策略
Yolov3论文中给出的训练策略
> YOLOv3 predicts an objectness score for each bounding box using logistic regression. This should be 1 if the bounding box prior overlaps a ground truth object by more than any other bounding box prior. If the bounding box prior is not the best but does overlap a ground truth object by more than some threshold we ignore the prediction, following [17]. We use the threshold of .5. Unlike [17] our system only assigns one bounding box prior for each ground truth object. If a bounding box prior is not assigned to a ground truth object it incurs no loss for coordinate or class predictions, only objectness.
总结如下:
1. 预测框一共分为三种情况:正例(positive)、负例(negative)、忽略样例(ignore)。
2. 正例:任取一个ground truth,与4032个框全部计算IOU,IOU最大的预测框,即为正例。并且一个预测框,只能分配给一个ground truth。例如第一个ground truth已经匹配了一个正例检测框,那么下一个ground truth,就在余下的4031个检测框中,寻找IOU最大的检测框作为正例。ground truth的先后顺序可忽略。正例产生置信度loss、检测框loss、类别loss。预测框为对应的ground truth box标签(需要反向编码,使用真实的x、y、w、h计算出 $t_x,t_y,t_w,t_h$ ;类别标签对应类别为1,其余为0;置信度标签为1。
3. 忽略样例:正例除外,与任意一个ground truth的IOU大于阈值(论文中使用0.5),则为忽略样例。忽略样例不产生任何loss。
4. 负例:正例除外(与ground truth计算后IOU最大的检测框,但是IOU小于阈值,仍为正例),与全部ground truth的IOU都小于阈值(0.5),则为负例。负例只有置信度产生loss,置信度标签为0。
<font color=blue>训练策略的一些疑难点:</font>
- ground truth为什么不按照中心点分配对应的预测box?
在Yolov3的训练策略中,不再像Yolov1那样,每个cell负责中心落在该cell中的ground truth。原因是Yolov3一共产生3个特征图,3个特征图上的cell,中心是有重合的。训练时,可能最契合的是特征图1的第3个box,但是推理的时候特征图2的第1个box置信度最高。所以Yolov3的训练,不再按照ground truth中心点,严格分配指定cell,而是根据预测值寻找IOU最大的预测框作为正例。
- Yolov1中的置信度标签,就是预测框与真实框的IOU,Yolov3为什么是1?
置信度意味着该预测框是或者不是一个真实物体,是一个二分类,所以标签是1、0更加合理。
- 为什么有忽略样例?
忽略样例是Yolov3中的点睛之笔。由于Yolov3使用了多尺度特征图,不同尺度的特征图之间会有重合检测部分。比如有一个真实物体,在训练时被分配到的检测框是特征图1的第三个box,IOU达0.98,此时恰好特征图2的第一个box与该ground truth的IOU达0.95,也检测到了该ground truth,如果此时给其置信度强行打0的标签,网络学习效果会不理想。
## 3.2 Loss函数
图1的Yolov3的损失函数抽象表达式如下:
<img src="https://s1.ax1x.com/2020/07/21/UTlWFA.png" style="zoom:50%;"/>
Yolov3 Loss为三个特征图Loss之和:
$$
Loss =loss_{N_1}+loss_{N_2}+loss_{N_3}
$$
- $\lambda$ 为权重常数,控制检测框Loss、obj置信度Loss、noobj置信度Loss之间的比例,通常负例的个数是正例的几十倍以上,可以通过权重超参控制检测效果。
- $1_{ij}^{obj}$ 若是正例则输出1,否则为0; $1_{ij}^{noobj}$ 若是负例则输出1,否则为0;忽略样例都输出0。
- x、y、w、h使用MSE作为损失函数,也可以使用smooth L1 loss(出自Faster R-CNN)作为损失函数。smooth L1可以使训练更加平滑。置信度、类别标签由于是0,1二分类,所以使用**二值交叉熵**作为损失函数。
```python
xy_loss = object_mask * box_loss_scale * K.binary_crossentropy(raw_true_xy, raw_pred[..., 0:2],
from_logits=True)
wh_loss = object_mask * box_loss_scale * 0.5 * K.square(raw_true_wh - raw_pred[..., 2:4])
confidence_loss = object_mask * K.binary_crossentropy(object_mask, raw_pred[..., 4:5], from_logits=True) + \
(1 - object_mask) * K.binary_crossentropy(object_mask, raw_pred[..., 4:5],
from_logits=True) * ignore_mask
class_loss = object_mask * K.binary_crossentropy(true_class_probs, raw_pred[..., 5:], from_logits=True)
xy_loss = K.sum(xy_loss) / mf
wh_loss = K.sum(wh_loss) / mf
confidence_loss = K.sum(confidence_loss) / mf
class_loss = K.sum(class_loss) / mf
loss += xy_loss + wh_loss + confidence_loss + class_loss
```
以上是一段keras框架描述的yolo v3 的loss_function代码。忽略恒定系数不看,可以从上述代码看出:除了w, h的损失函数依然采用总方误差之外,其他部分的损失函数用的是二值交叉熵(binary_crossentropy),最后加到一起。关于binary_crossentropy的公式详情可参考博文[《常见的损失函数》](https://blog.csdn.net/legalhighhigh/article/details/81409551)。
# 四、精度与性能
<img src="https://img2020.cnblogs.com/blog/1534055/202007/1534055-20200727232944334-1585239940.png" alt="图8:精度对比图(on coco)" style="zoom:50%;" />
<img src="https://img2020.cnblogs.com/blog/1534055/202007/1534055-20200727232825488-415229885.png" alt="图9:性能对比图(on coco)" style="zoom:30%;" />
由以上两图可以得到结论:Yolov3精度与SSD相比略有小优,与Faster R-CNN相比略有逊色,几乎持平,比RetinaNet差。但是速度是SSD、RetinaNet、Faster R-CNN至少2倍以上。输入尺寸为320*320的Yolov3,单张图片处理仅需22ms,简化后的Yolov3 tiny可以更快。
# 五、代码实现
## 5.1 权重文件准备
1. 第一步:下载权重文件
- git clone https://github.com/mystic123/tensorflow-yolo-v3.git
2. 第二步:权重文件格式转换
- 切换到tensorflow-yolo-v3目录,保证在这个文件夹下面有`coco.names`和`yolov3.weights`两个文件
- 在当前目录打开TF1.14环境的Anaconda Prompt ,执行如下转换程序
- **转换成ckpt文件格式**
```
python convert_weights.py --class_names coco.names --data_format NHWC --weights_file yolov3.weights
```
效果: 默认在当前文件夹下新建一个saved_model文件夹,里面是转换生成的文件
- **转换成pb文件格式**
```
python convert_weights_pb.py --class_names coco.names --data_format NHWC --weights_file yolov3.weights
```
效果:默认在当前文件夹下生成一个`frozen_darknet_yolov3_model.pb`文件
<font color=orange>如果是转换自己训练的数据集,则将coco.names和yolov3.weights替换成自己相应的文件就可以了。 </font>
## 5.2 代码结构
tensorflow版本为1.14 。代码结构如图10所示。
<img src="https://s1.ax1x.com/2020/07/28/akGifU.png" alt="图10:代码结构" style="zoom:80%;" />
工程只有三个程序文件,其中`v3_model.py`为模型骨架,因为过于复杂,把它单独分离出来。`v3_pic.py`和`v3_video.py`分别是检测图片和检测视频的程序。
model文件夹中存放转化好的权重文件;output文件夹存放视频检测后输出的每一帧图片;test文件夹存放测试样例;font文件夹存放字体。
## 5.3 公共模型
<font color=red>v3_model.py</font>
```python
# -*- coding: utf-8 -*-
import numpy as np
import tensorflow as tf
slim = tf.contrib.slim
#定义darknet块:一个短链接加一个同尺度卷积再加一个下采样卷积
def _darknet53_block(inputs, filters):
shortcut = inputs
inputs = slim.conv2d(inputs, filters, 1, stride=1, padding='SAME')#正常卷积
inputs = slim.conv2d(inputs, filters * 2, 3, stride=1, padding='SAME')#正常卷积
inputs = inputs + shortcut
return inputs
def _conv2d_fixed_padding(inputs, filters, kernel_size, strides=1):
assert strides>1
inputs = _fixed_padding(inputs, kernel_size)#外围填充0,好支持valid卷积
inputs = slim.conv2d(inputs, filters, kernel_size, stride=strides, padding= 'VALID')
return inputs
#对指定输入填充0
def _fixed_padding(inputs, kernel_size, *args, mode='CONSTANT', **kwargs):
pad_total = kernel_size - 1
pad_beg = pad_total // 2
pad_end = pad_total - pad_beg
#inputs 【b,h,w,c】 pad b,c不变。h和w上下左右,填充0.kernel = 3 ,则上下左右各加一趟0
padded_inputs = tf.pad(inputs, [[0, 0], [pad_beg, pad_end],
[pad_beg, pad_end], [0, 0]], mode=mode)
return padded_inputs
#定义Darknet-53 模型.返回3个不同尺度的特征
def darknet53(inputs):
inputs = slim.conv2d(inputs, 32, 3, stride=1, padding='SAME')#正常卷积
inputs = _conv2d_fixed_padding(inputs, 64, 3, strides=2)#需要填充,并使用了'VALID' (-1, 208, 208, 64)
inputs = _darknet53_block(inputs, 32)#darknet块
inputs = _conv2d_fixed_padding(inputs, 128, 3, strides=2)
for i in range(2):
inputs = _darknet53_block(inputs, 64)
inputs = _conv2d_fixed_padding(inputs, 256, 3, strides=2)
for i in range(8):
inputs = _darknet53_block(inputs, 128)
route_1 = inputs #特征1 (-1, 52, 52, 128)
inputs = _conv2d_fixed_padding(inputs, 512, 3, strides=2)
for i in range(8):
inputs = _darknet53_block(inputs, 256)
route_2 = inputs#特征2 (-1, 26, 26, 256)
inputs = _conv2d_fixed_padding(inputs, 1024, 3, strides=2)
for i in range(4):
inputs = _darknet53_block(inputs, 512)#特征3 (-1, 13, 13, 512)
return route_1, route_2, inputs#在原有的darknet53,还会跟一个全局池化。这里没有使用。所以其实是只有52层
_BATCH_NORM_DECAY = 0.9
_BATCH_NORM_EPSILON = 1e-05
_LEAKY_RELU = 0.1
#定义候选框,来自coco数据集
_ANCHORS = [(10, 13), (16, 30), (33, 23), (30, 61), (62, 45), (59, 119), (116, 90), (156, 198), (373, 326)]
#yolo检测块
def _yolo_block(inputs, filters):
inputs = slim.conv2d(inputs, filters, 1, stride=1, padding='SAME')#正常卷积
inputs = slim.conv2d(inputs, filters * 2, 3, stride=1, padding='SAME')#正常卷积
inputs = slim.conv2d(inputs, filters, 1, stride=1, padding='SAME')#正常卷积
inputs = slim.conv2d(inputs, filters * 2, 3, stride=1, padding='SAME')#正常卷积
inputs = slim.conv2d(inputs, filters, 1, stride=1, padding='SAME')#正常卷积
route = inputs
inputs = slim.conv2d(inputs, filters * 2, 3, stride=1, padding='SAME')#正常卷积
return route, inputs
#检测层
def _detection_layer(inputs, num_classes, anchors, img_size, data_format):
print(inputs.get_shape())
num_anchors = len(anchors)#候选框个数
predictions = slim.conv2d(inputs, num_anchors * (5 + num_classes), 1, stride=1, normalizer_fn=None,
activation_fn=None, biases_initializer=tf.zeros_initializer())
shape = predictions.get_shape().as_list()
print("shape",shape)#三个尺度的形状分别为:[1, 13, 13, 3*(5+c)]、[1, 26, 26, 3*(5+c)]、[1, 52, 52, 3*(5+c)]
grid_size = shape[1:3]#去 NHWC中的HW
dim = grid_size[0] * grid_size[1]#每个格子所包含的像素
bbox_attrs = 5 + num_classes
predictions = tf.reshape(predictions, [-1, num_anchors * dim, bbox_attrs])#把h和w展开成dim
stride = (img_size[0] // grid_size[0], img_size[1] // grid_size[1])#缩放参数 32(416/13)
anchors = [(a[0] / stride[0], a[1] / stride[1]) for a in anchors]#将候选框的尺寸同比例缩小
#将包含边框的单元属性拆分
box_centers, box_sizes, confidence, classes = tf.split(predictions, [2, 2, 1, num_classes], axis=-1)
box_centers = tf.nn.sigmoid(box_centers)
confidence = tf.nn.sigmoid(confidence)
grid_x = tf.range(grid_size[0], dtype=tf.float32)#定义网格索引0,1,2...n
grid_y = tf.range(grid_size[1], dtype=tf.float32)#定义网格索引0,1,2,...m
a, b = tf.meshgrid(grid_x, grid_y)#生成网格矩阵 a0,a1.。。an(共M行) , b0,b0,。。。b0(共n个),第二行为b1
x_offset = tf.reshape(a, (-1, 1))#展开 一共dim个
y_offset = tf.reshape(b, (-1, 1))
x_y_offset = tf.concat([x_offset, y_offset], axis=-1)#连接----[dim,2]
x_y_offset = tf.reshape(tf.tile(x_y_offset, [1, num_anchors]), [1, -1, 2])#按候选框的个数复制xy(【1,n】代表第0维一次,第1维n次)
box_centers = box_centers + x_y_offset#box_centers为0-1,x_y为具体网格的索引,相加后,就是真实位置(0.1+4=4.1,第4个网格里0.1的偏移)
box_centers = box_centers * stride#真实尺寸像素点
anchors = tf.tile(anchors, [dim, 1])
box_sizes = tf.exp(box_sizes) * anchors#计算边长:hw
box_sizes = box_sizes * stride#真实边长
detections = tf.concat([box_centers, box_sizes, confidence], axis=-1)
classes = tf.nn.sigmoid(classes)
predictions = tf.concat([detections, classes], axis=-1)#将转化后的结果合起来
print(predictions.get_shape())#三个尺度的形状分别为:[1, 507(13*13*3), 5+c]、[1, 2028, 5+c]、[1, 8112, 5+c]
return predictions#返回预测值
#定义上采样函数
def _upsample(inputs, out_shape):
#由于上采样的填充方式不同,tf.image.resize_bilinear会对结果影响很大
inputs = tf.image.resize_nearest_neighbor(inputs, (out_shape[1], out_shape[2]))
inputs = tf.identity(inputs, name='upsampled')
return inputs
#定义yolo函数
def yolo_v3(inputs, num_classes, is_training=False, data_format='NHWC', reuse=False):
assert data_format=='NHWC'
img_size = inputs.get_shape().as_list()[1:3]#获得输入图片大小
inputs = inputs / 255 #归一化
#定义批量归一化参数
batch_norm_params = {
'decay': _BATCH_NORM_DECAY,
'epsilon': _BATCH_NORM_EPSILON,
'scale': True,
'is_training': is_training,
'fused': None,
}
#定义yolo网络.
with slim.arg_scope([slim.conv2d, slim.batch_norm], data_format=data_format, reuse=reuse):
with slim.arg_scope([slim.conv2d], normalizer_fn=slim.batch_norm, normalizer_params=batch_norm_params,
biases_initializer=None, activation_fn=lambda x: tf.nn.leaky_relu(x, alpha=_LEAKY_RELU)):
with tf.variable_scope('darknet-53'):
route_1, route_2, inputs = darknet53(inputs)
with tf.variable_scope('yolo-v3'):
route, inputs = _yolo_block(inputs, 512)#(-1, 13, 13, 1024)
#使用候选框参数来辅助识别
detect_1 = _detection_layer(inputs, num_classes, _ANCHORS[6:9], img_size, data_format)
detect_1 = tf.identity(detect_1, name='detect_1')
inputs = slim.conv2d(route, 256, 1, stride=1, padding='SAME')#正常卷积
upsample_size = route_2.get_shape().as_list()
inputs = _upsample(inputs, upsample_size)
inputs = tf.concat([inputs, route_2], axis=3)
route, inputs = _yolo_block(inputs, 256)#(-1, 26, 26, 512)
detect_2 = _detection_layer(inputs, num_classes, _ANCHORS[3:6], img_size, data_format)
detect_2 = tf.identity(detect_2, name='detect_2')
inputs = slim.conv2d(route, 128, 1, stride=1, padding='SAME')#正常卷积
upsample_size = route_1.get_shape().as_list()
inputs = _upsample(inputs, upsample_size)
inputs = tf.concat([inputs, route_1], axis=3)
_, inputs = _yolo_block(inputs, 128)#(-1, 52, 52, 256)
detect_3 = _detection_layer(inputs, num_classes, _ANCHORS[0:3], img_size, data_format)
detect_3 = tf.identity(detect_3, name='detect_3')
detections = tf.concat([detect_1, detect_2, detect_3], axis=1)
detections = tf.identity(detections, name='detections')
return detections#返回了3个尺度。每个尺度里又包含3个结果(-1, 10647( 507 +2028 + 8112), 5+c)
'''--------Test--------'''
# if __name__ == "__main__":
# tf.reset_default_graph()
# import cv2
# data = cv2.imread('test.jpg')
# data = cv2.cvtColor( data, cv2.COLOR_BGR2RGB )
# data = cv2.resize( data, ( 416, 416 ) )
# data = tf.cast( tf.expand_dims( tf.constant( data ), 0 ), tf.float32 )
# detections = yolo_v3( data,3,data_format='NHWC' )
# with tf.Session() as sess:
# sess.run( tf.global_variables_initializer() )
# print( sess.run( detections ).shape )
```
## 5.4 基于图片的目标检测
<font color=red>v3_pic.py</font>
```python
# -*- coding: utf-8 -*-
import numpy as np
import tensorflow as tf
import cv2
from PIL import Image, ImageDraw, ImageFont
my_model = __import__("v3_model")
yolo_v3 = my_model.yolo_v3
size = 416
input_img ='D:\\计算机视觉\\已完成的代码\\yolo\\test\\6.jpg'
output_img = 'out.jpg'
class_names = 'D:\\计算机视觉\\已完成的代码\\yolo\\model\\v3\\coco.names'
weights_file = 'D:\\计算机视觉\\已完成的代码\\yolo\\model\\v3\\yolov3.weights'
conf_threshold = 0.5 #置信度阈值
iou_threshold = 0.4 #重叠区域阈值
#定义函数:将中心点、高、宽坐标 转化为[x0, y0, x1, y1]坐标形式
def detections_boxes(detections):
center_x, center_y, width, height, attrs = tf.split(detections, [1, 1, 1, 1, -1], axis=-1)
w2 = width / 2
h2 = height / 2
x0 = center_x - w2
y0 = center_y - h2
x1 = center_x + w2
y1 = center_y + h2
boxes = tf.concat([x0, y0, x1, y1], axis=-1)
detections = tf.concat([boxes, attrs], axis=-1)
return detections
#定义函数计算两个框的内部重叠情况(IOU)box1,box2为左上、右下的坐标[x0, y0, x1, x2]
def _iou(box1, box2):
b1_x0, b1_y0, b1_x1, b1_y1 = box1
b2_x0, b2_y0, b2_x1, b2_y1 = box2
int_x0 = max(b1_x0, b2_x0)
int_y0 = max(b1_y0, b2_y0)
int_x1 = min(b1_x1, b2_x1)
int_y1 = min(b1_y1, b2_y1)
int_area = (int_x1 - int_x0) * (int_y1 - int_y0)
b1_area = (b1_x1 - b1_x0) * (b1_y1 - b1_y0)
b2_area = (b2_x1 - b2_x0) * (b2_y1 - b2_y0)
#分母加个1e-05,避免除数为 0
iou = int_area / (b1_area + b2_area - int_area + 1e-05)
return iou
#使用NMS方法,对结果去重
def non_max_suppression(predictions_with_boxes, confidence_threshold, iou_threshold=0.4):
conf_mask = np.expand_dims((predictions_with_boxes[:, :, 4] > confidence_threshold), -1)
predictions = predictions_with_boxes * conf_mask
result = {}
for i, image_pred in enumerate(predictions):
shape = image_pred.shape
#print("shape1",shape)
non_zero_idxs = np.nonzero(image_pred)
image_pred = image_pred[non_zero_idxs[0]]
#print("shape2",image_pred.shape)
image_pred = image_pred.reshape(-1, shape[-1])
bbox_attrs = image_pred[:, :5]
classes = image_pred[:, 5:]
classes = np.argmax(classes, axis=-1)
unique_classes = list(set(classes.reshape(-1)))
for cls in unique_classes:
cls_mask = classes == cls
cls_boxes = bbox_attrs[np.nonzero(cls_mask)]
cls_boxes = cls_boxes[cls_boxes[:, -1].argsort()[::-1]]
cls_scores = cls_boxes[:, -1]
cls_boxes = cls_boxes[:, :-1]
while len(cls_boxes) > 0:
box = cls_boxes[0]
score = cls_scores[0]
if not cls in result:
result[cls] = []
result[cls].append((box, score))
cls_boxes = cls_boxes[1:]
ious = np.array([_iou(box, x) for x in cls_boxes])
iou_mask = ious < iou_threshold
cls_boxes = cls_boxes[np.nonzero(iou_mask)]
cls_scores = cls_scores[np.nonzero(iou_mask)]
return result
#加载权重
def load_weights(var_list, weights_file):
with open(weights_file, "rb") as fp:
_ = np.fromfile(fp, dtype=np.int32, count=5)#跳过前5个int32
weights = np.fromfile(fp, dtype=np.float32)
ptr = 0
i = 0
assign_ops = []
while i < len(var_list) - 1:
var1 = var_list[i]
var2 = var_list[i + 1]
#找到卷积项
if 'Conv' in var1.name.split('/')[-2]:
# 找到BN参数项
if 'BatchNorm' in var2.name.split('/')[-2]:
# 加载批量归一化参数
gamma, beta, mean, var = var_list[i + 1:i + 5]
batch_norm_vars = [beta, gamma, mean, var]
for var in batch_norm_vars:
shape = var.shape.as_list()
num_params = np.prod(shape)
var_weights = weights[ptr:ptr + num_params].reshape(shape)
ptr += num_params
assign_ops.append(tf.assign(var, var_weights, validate_shape=True))
i += 4#已经加载了4个变量,指针移动4
elif 'Conv' in var2.name.split('/')[-2]:
bias = var2
bias_shape = bias.shape.as_list()
bias_params = np.prod(bias_shape)
bias_weights = weights[ptr:ptr + bias_params].reshape(bias_shape)
ptr += bias_params
assign_ops.append(tf.assign(bias, bias_weights, validate_shape=True))
i += 1#移动指针
shape = var1.shape.as_list()
num_params = np.prod(shape)
#加载权重
var_weights = weights[ptr:ptr + num_params].reshape((shape[3], shape[2], shape[0], shape[1]))
var_weights = np.transpose(var_weights, (2, 3, 1, 0))
ptr += num_params
assign_ops.append(tf.assign(var1, var_weights, validate_shape=True))
i += 1
return assign_ops
#将级别结果显示在图片上
def draw_boxes(boxes, img, cls_names, detection_size):
draw = ImageDraw.Draw(img)
for cls, bboxs in boxes.items():
color = tuple(np.random.randint(0, 256, 3)) #为每一个识别到的物体各设置一种颜色
for box, score in bboxs:
box = convert_to_original_size(box, np.array(detection_size), np.array(img.size))
draw.rectangle(box, outline=color, width=3)
#fontText = ImageFont.truetype("./font/simhei.ttf", textSize, encoding="utf-8")
fontText = ImageFont.truetype('./font/simhei.ttf', 30) #设置字体大小
draw.text(box[:2], '{} {:.2f}%'.format(cls_names[cls], score * 100), fill=color,font=fontText)
print(cls_names[cls].replace('\n', '') , '{:.2f}%'.format( score * 100),box[:2])
def convert_to_original_size(box, size, original_size):
ratio = original_size / size
box = box.reshape(2, 2) * ratio
return list(box.reshape(-1))
#加载数据集标签名称
def load_coco_names(file_name):
names = {}
with open(file_name) as f:
for id, name in enumerate(f):
names[id] = name
return names
def main(argv=None):
tf.reset_default_graph()
img = Image.open(input_img)
img_resized = img.resize(size=(size, size))
classes = load_coco_names(class_names) #这里的读取到的名字,都跟着一个换行符,可以使用.replace('\n', '')删掉它
#定义输入占位符
inputs = tf.placeholder(tf.float32, [None, size, size, 3])
with tf.variable_scope('detector'):
detections = yolo_v3(inputs, len(classes), data_format='NHWC')#定义网络结构
#加载权重
load_ops = load_weights(tf.global_variables(scope='detector'), weights_file)
boxes = detections_boxes(detections)
with tf.Session() as sess:
sess.run(load_ops)
detected_boxes = sess.run(boxes, feed_dict={inputs: [np.array(img_resized, dtype=np.float32)]})
#对10647个预测框进行去重
filtered_boxes = non_max_suppression(detected_boxes, confidence_threshold=conf_threshold,
iou_threshold=iou_threshold)
draw_boxes(filtered_boxes, img, classes, (size, size))
img.save(output_img)
img.show()
if __name__ == '__main__':
main()
```
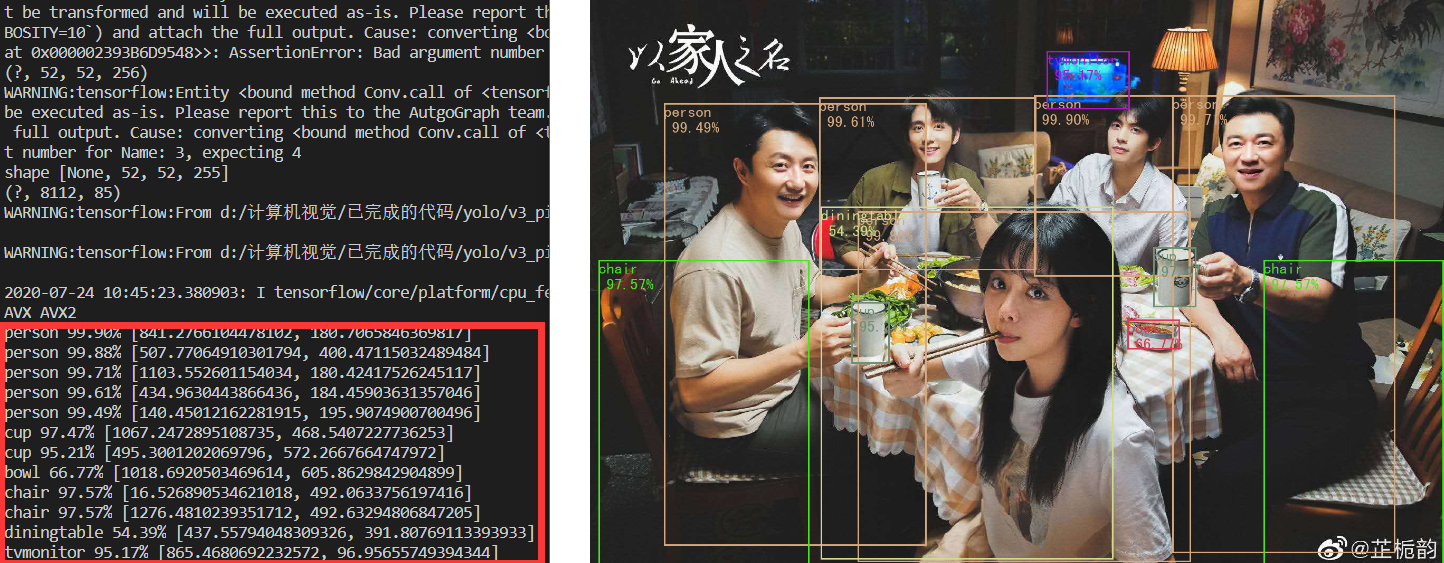
**测试1:**
先来一张合影照片,效果还不错。

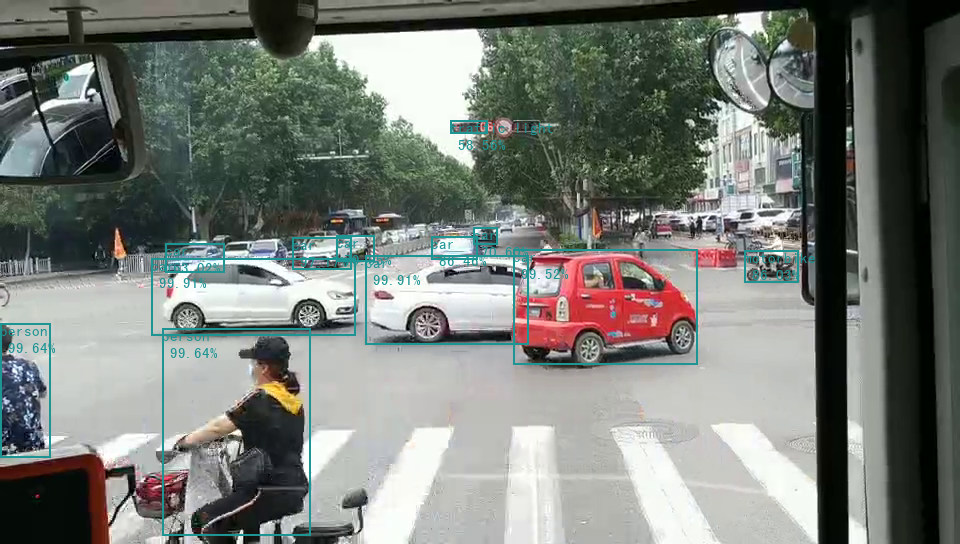
**测试2:**
当然,有一张图片在v1、v2中都检测失败了,这次肯定还要拿出来试一试,很开心在v3的实验中检测到了一些东西,虽说把电动三轮车识别成了truck和bus......

## 5.5 基于视频的目标检测
<font color=red>v3_video.py</font>
```python
# -*- coding: utf-8 -*-
import numpy as np
import tensorflow as tf
import cv2
from PIL import Image, ImageDraw, ImageFont
my_model = __import__("v3_model")
yolo_v3 = my_model.yolo_v3
size = 416
input_video ='D:\\计算机视觉\\已完成的代码\\yolo\\test\\3.mp4'
class_names = 'D:\\计算机视觉\\已完成的代码\\yolo\\model\\v3\\coco.names'
weights_file = 'D:\\计算机视觉\\已完成的代码\\yolo\\model\\v3\\yolov3.weights'
conf_threshold = 0.5 #置信度阈值
iou_threshold = 0.4 #重叠区域阈值
#定义函数:将中心点、高、宽坐标 转化为[x0, y0, x1, y1]坐标形式
def detections_boxes(detections):
center_x, center_y, width, height, attrs = tf.split(detections, [1, 1, 1, 1, -1], axis=-1)
w2 = width / 2
h2 = height / 2
x0 = center_x - w2
y0 = center_y - h2
x1 = center_x + w2
y1 = center_y + h2
boxes = tf.concat([x0, y0, x1, y1], axis=-1)
detections = tf.concat([boxes, attrs], axis=-1)
return detections
#定义函数计算两个框的内部重叠情况(IOU)box1,box2为左上、右下的坐标[x0, y0, x1, x2]
def _iou(box1, box2):
b1_x0, b1_y0, b1_x1, b1_y1 = box1
b2_x0, b2_y0, b2_x1, b2_y1 = box2
int_x0 = max(b1_x0, b2_x0)
int_y0 = max(b1_y0, b2_y0)
int_x1 = min(b1_x1, b2_x1)
int_y1 = min(b1_y1, b2_y1)
int_area = (int_x1 - int_x0) * (int_y1 - int_y0)
b1_area = (b1_x1 - b1_x0) * (b1_y1 - b1_y0)
b2_area = (b2_x1 - b2_x0) * (b2_y1 - b2_y0)
#分母加个1e-05,避免除数为 0
iou = int_area / (b1_area + b2_area - int_area + 1e-05)
return iou
#使用NMS方法,对结果去重
def non_max_suppression(predictions_with_boxes, confidence_threshold, iou_threshold=0.4):
conf_mask = np.expand_dims((predictions_with_boxes[:, :, 4] > confidence_threshold), -1)
predictions = predictions_with_boxes * conf_mask
result = {}
for i, image_pred in enumerate(predictions):
shape = image_pred.shape
#print("shape1",shape)
non_zero_idxs = np.nonzero(image_pred)
image_pred = image_pred[non_zero_idxs[0]]
#print("shape2",image_pred.shape)
image_pred = image_pred.reshape(-1, shape[-1])
bbox_attrs = image_pred[:, :5]
classes = image_pred[:, 5:]
classes = np.argmax(classes, axis=-1)
unique_classes = list(set(classes.reshape(-1)))
for cls in unique_classes:
cls_mask = classes == cls
cls_boxes = bbox_attrs[np.nonzero(cls_mask)]
cls_boxes = cls_boxes[cls_boxes[:, -1].argsort()[::-1]]
cls_scores = cls_boxes[:, -1]
cls_boxes = cls_boxes[:, :-1]
while len(cls_boxes) > 0:
box = cls_boxes[0]
score = cls_scores[0]
if not cls in result:
result[cls] = []
result[cls].append((box, score))
cls_boxes = cls_boxes[1:]
ious = np.array([_iou(box, x) for x in cls_boxes])
iou_mask = ious < iou_threshold
cls_boxes = cls_boxes[np.nonzero(iou_mask)]
cls_scores = cls_scores[np.nonzero(iou_mask)]
return result
#加载权重
def load_weights(var_list, weights_file):
with open(weights_file, "rb") as fp:
_ = np.fromfile(fp, dtype=np.int32, count=5)#跳过前5个int32
weights = np.fromfile(fp, dtype=np.float32)
ptr = 0
i = 0
assign_ops = []
while i < len(var_list) - 1:
var1 = var_list[i]
var2 = var_list[i + 1]
#找到卷积项
if 'Conv' in var1.name.split('/')[-2]:
# 找到BN参数项
if 'BatchNorm' in var2.name.split('/')[-2]:
# 加载批量归一化参数
gamma, beta, mean, var = var_list[i + 1:i + 5]
batch_norm_vars = [beta, gamma, mean, var]
for var in batch_norm_vars:
shape = var.shape.as_list()
num_params = np.prod(shape)
var_weights = weights[ptr:ptr + num_params].reshape(shape)
ptr += num_params
assign_ops.append(tf.assign(var, var_weights, validate_shape=True))
i += 4#已经加载了4个变量,指针移动4
elif 'Conv' in var2.name.split('/')[-2]:
bias = var2
bias_shape = bias.shape.as_list()
bias_params = np.prod(bias_shape)
bias_weights = weights[ptr:ptr + bias_params].reshape(bias_shape)
ptr += bias_params
assign_ops.append(tf.assign(bias, bias_weights, validate_shape=True))
i += 1#移动指针
shape = var1.shape.as_list()
num_params = np.prod(shape)
#加载权重
var_weights = weights[ptr:ptr + num_params].reshape((shape[3], shape[2], shape[0], shape[1]))
var_weights = np.transpose(var_weights, (2, 3, 1, 0))
ptr += num_params
assign_ops.append(tf.assign(var1, var_weights, validate_shape=True))
i += 1
return assign_ops
#将级别结果显示在图片上
def draw_boxes(j,boxes, img, cls_names, detection_size):
draw = ImageDraw.Draw(img)
f = open('./output/final_v3.txt', "a")
for cls, bboxs in boxes.items():
#color = tuple(np.random.randint(0, 256, 3)) #为每一个识别到的物体各设置一种颜色
for box, score in bboxs:
box = convert_to_original_size(box, np.array(detection_size), np.array(img.size))
draw.rectangle(box, outline=(30,148,147), width=2)
fontText = ImageFont.truetype('./font/simhei.ttf', 15) #设置字体大小
draw.text(box[:2], '{} {:.2f}%'.format(cls_names[cls], score * 100), fill=(30,148,147),font=fontText)
#print(cls_names[cls].replace('\n', '') , '{:.2f}%'.format( score * 100),box[:2])
f.write(str(cls_names[cls].replace('\n', '')) +' '+ '{:.2f}%'.format( score * 100) +' '+ str(box[:2])+'\n')
#cv2.imwrite(address,draw)
address = './output/' + str(j)+ '.png'
img.save(address)
f.write('\n') #把每一个框分开
f.write('\n\n\n\n\n\n\n\n\n\n\n\n') #把每一帧分开
def convert_to_original_size(box, size, original_size):
ratio = original_size / size
box = box.reshape(2, 2) * ratio
return list(box.reshape(-1))
#加载数据集标签名称
def load_coco_names(file_name):
names = {}
with open(file_name) as f:
for id, name in enumerate(f):
names[id] = name
return names
def main(argv=None):
tf.reset_default_graph()
classes = load_coco_names(class_names) #这里的读取到的名字,都跟着一个换行符,可以使用.replace('\n', '')删掉它
#定义输入占位符
inputs = tf.placeholder(tf.float32, [None, size, size, 3])
with tf.variable_scope('detector'):
detections = yolo_v3(inputs, len(classes), data_format='NHWC')#定义网络结构
#加载权重
load_ops = load_weights(tf.global_variables(scope='detector'), weights_file)
boxes = detections_boxes(detections)
sess = tf.Session()
sess.run(load_ops)
# 读取视频文件
cap = cv2.VideoCapture(input_video)
#读帧
j=0
while cap.isOpened():
ret, frame = cap.read()
frame = Image.fromarray(cv2.cvtColor(frame,cv2.COLOR_BGR2RGB)) #将cv2类型的图片转化为PIL类型的。参考:https://zhuanlan.zhihu.com/p/87441580
img_resized = frame.resize(size=(size, size))
detected_boxes = sess.run(boxes, feed_dict={inputs: [np.array(img_resized, dtype=np.float32)]})
#对10647个预测框进行去重
filtered_boxes = non_max_suppression(detected_boxes, confidence_threshold=conf_threshold,iou_threshold=iou_threshold)
draw_boxes(j,filtered_boxes, frame, classes, (size, size))
j=j+1
if __name__ == '__main__':
main()
```
测试视频时,运行速度非常慢,我人工数了一下,几乎每输出一帧处理后的图片都需要8秒,这比v1慢的多很多(不到1秒就能1帧,v2最快,肉眼可见的快)。经过反复的修改后发现,时间浪费在了程序的冗余计算上,比如sess的闭合,要把sess.run(load_ops) 放在迭代程序之外,并且提前定义sess = tf.Session() 不能在迭代程序里一次次的使用with结构。最终的程序速度可以达到快于v1但慢于v2的状态,大概在1秒两帧的样子(当然,由于硬件差异,与作者给出的性能肯定是有差距,但和作者给出的性能对比是吻合的)。
另外,在单张图片识别时,我用随机的不同的颜色描述不同种类的物体有助于区分,视觉体验较好;但在处理视频时,这种方式就会使结果显得很杂乱,因为连续的两张图中,同一个物体被标注了不同颜色就感觉很奇怪,所以就把随机颜色的功能删掉,改成固定颜色(青色)。
还是老样子,取视频的第30帧做展示,输出视频(共208帧)已上传到蓝奏云网盘。

{% note success %}
原视频 。见:[传送门](https://wwa.lanzous.com/ivijLej0vmb)
处理后的视频(因上传大小限制,分成了两段视频。)见:[传送门1](https://wwa.lanzous.com/i4Rvaey7gcd) [传送门2](https://wwa.lanzous.com/iH8gaey7hmj)
另外,检测到的bbox位置也特别多,无法截图展示,我就把信息全部写入到了txt文本中。注意:连续的三个为三个框,分别由一个换行符隔开;每一帧图片再由12个换行符隔开。见:[传送门](https://cdn.jsdelivr.net/gh/han-suyu/cdn_others/final_v3.txt)
{% endnote %}
> **参考:**
> https://pjreddie.com/darknet/yolo/
> https://zhuanlan.zhihu.com/p/76802514
> //www.greatytc.com/p/af8a9c83e530
